Powered by Blogger.

Knowledge Dojo

    • Home
    • JavaScript
    • _Concepts
    • Unity
    • C#
    • About
    • Contact

    !!!!!In C#, we have been using collections like IEnumerable, ICollection, IList interchangeably but do you really know what is it that separates each other.

    They all have specific characteristics that differentiate them and makes them adaptable to certain scenarios.

    All of the above holds a list maintaining the order of items but which one should we use and in which case, let's see.

    IEnumerable

    Namespace: System.Collections

    An IEnumerable is a list or a container which can hold some items. You can iterate through each element in the IEnumerable. You can not edit the items like adding, deleting, updating, etc. instead you just use a container to contain a list of items. It is the most basic type of list container.

    All you get in an IEnumerable is an enumerator that helps in iterating over the elements. An IEnumerable does not hold even the count of the items in the list, instead, you have to iterate over the elements to get the count of items.

    An IEnumerable supports filtering elements using where clause.

    ICollection

    Namespace: System.Collections

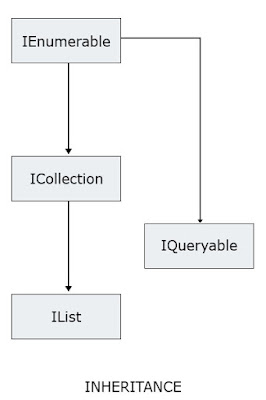
    ICollection is another type of collection, which derives from IEnumerable and extends its functionality to add, remove, update element in the list. ICollection also holds the count of elements in it and we do not need to iterate over all elements to get the total number of elements. 

    The count of total items can be retrieved in O(1) time.

    ICollection supports enumerating over the elements, filtering elements, adding new elements, deleting existing elements, updating existing elements and getting the count of available items on the list.

    IList

    Namespace: System.Collections

    IList extends ICollection. An IList can perform all operations combined from IEnumerable and ICollection, and some more operations like inserting or removing an element in the middle of a list.

    You can use a foreach loop or a for loop to iterate over the elements.

    IQueryable

    Namespace: System.Linq

    IQueryable extends ICollection. An IQueryable generates a LINQ to SQL expression that is executed over the database layer. Instead of the generating a Func<T, bool> like the ones above, IQueryable generates an expression tree and gives Expression<Func<T, bool>> that is executed over the database layer to get data set.
    JS has no formal support for classes. Still, there is a workaround for object-oriented programming in JS.
    We can use the complex object data type to create objects in Javascript.
    To create objects in JS, there are different patterns that can be followed.
      These patterns are:
    1. Factory Pattern
    2. Constructor Pattern
    3. Prototype Pattern
    4. Dynamic Prototype Pattern

    FACTORY PATTERN

    In Factory pattern, we create a factory that creates specified objects and returns their reference. Every time, we call the factory, we will get a new instance.
    Consider the example, where we want to create objects for a computer that will contain their memory capacities(ram and hard disk).
    We will create a factory like:
    //Factory pattern for object Creation
    var computerFactory = function(ram, hardDisk){
     var computer = {}; //creating a new temporary object
    
     //Create class properties
     computer.ram = ram;
     computer.hardDisk = hardDisk;
    
     //Create class methods 
     computer.AvailableMemory = function(){
      console.log("\nHard-disk : " + this.hardDisk);
      console.log("Ram : " + this.ram);
     }
    
     return computer;
    };
    Now we will create an object by calling the factory like this.
    //Creating new object(s) for computer class by using computerFactory
    var computer1 = computerFactory(4,512);
    var computer2 = computerFactory(16,1024);
    
    //Accessing class methods using objects
    computer1.AvailableMemory();
    computer2.AvailableMemory();
    
    Output>
    Hard-disk : 512
    Ram : 4

    Hard-disk : 1024
    Ram : 16

    CONSTRUCTOR PATTERN

    In this, we do not return the instance from the function, instead, we use the new operator along with the function name.
    The constructor for the last example will be created like this.
    var computer = function(ram, hardDisk){
     //Create class properties
     this.ram = ram;
     this.hardDisk = hardDisk;
    
     //Create class methods 
     this.AvailableMemory = function(){
      console.log("\nHarddisk : " + this.hardDisk);
      console.log("Ram : " + this.ram);
     }
    };
    
    Note that, we are not returning the object from the computer constructor.
    //Creating new object(s) for computer class by using constructor pattern
    var computer1 = new computer(4,512);
    var computer2 = new computer(16,1024);
    
    //Accessing object's properties
    computer1.AvailableMemory();
    computer2.AvailableMemory();
    
    Output>
    Hard-disk : 512
    Ram : 4

    Hard-disk : 1024
    Ram : 16

    PROTOTYPE PATTERN

    In JS, almost every object has some prototype space that contains properties related to the object.
    You can read more about prototype here.
    In prototype pattern, we create a blank object and assign properties (and functions also) to its prototype with some default values and then we create a blank object and assign the actual values for the properties.
    This pattern can be represented as:
    var computer = function(){};
    
    computer.prototype.ram = NaN;
    computer.prototype.hardDisk = NaN;
    computer.prototype.AvailableMemory = function(){
     console.log("\nHarddisk : " + this.hardDisk);
     console.log("Ram : " + this.ram);
    }
    

    //Creating new object(s) for computer class by using Prototype Pattern
    var computer1 = new computer(); //Empty objecty created with default values
    computer1.ram = 4; //Assigning the actual value for object property
    computer1.hardDisk = 512;
    
    var computer2 = new computer();
    computer2.ram = 16;
    computer2.hardDisk = 1024;
    
    //Accessing class methods using objects
    computer1.AvailableMemory();
    computer2.AvailableMemory();
    
    Output>
    Hard-disk : 512
    Ram : 4

    Hard-disk : 1024
    Ram : 16

    Now consider if we create a new object of the computer with default values.
    var computer1 = new computer(); //Created object with default values

    console.log('ram' in computer1); //returns true
    console.log(computer1.hasOwnProperty('ram')); //returns false
    
    This is because the in operator searches for the property first in the object's root and then search continues in the prototype of the object whereas hasOwnProperty restricts its search to the root elements of the object in which the property is being searched.


    Dynamic Prototype Pattern

    Dynamic prototype pattern is a hybrid of constructor pattern and prototype pattern.
    In this pattern, we reference the properties using this operator and we create the member functions in the prototype space of the object if the member function does not exist.
    var computerDynamicProto = function(ram, hardDisk){
     this.ram = ram;
     this.hardDisk = hardDisk;
    
     if(typeof this.AvailableMemory !== 'function'){
      computerDynamicProto.prototype.AvailableMemory = function(){
       console.log("\nHarddisk : " + this.hardDisk);
       console.log("Ram : " + this.ram);
      }
     }
    };
    
    var computer1 = new computerDynamicProto(4,512);
    computer1.AvailableMemory();
    
    Output>
    Hard-disk : 512
    Ram : 4

    Hoisting is a process in which all variables and method declarations are moved to the top of the executing program, no matter at what position we write them.
    In other words, a variable or a function can be used even before its declaration in a code block.
    doSomething();
    
    function doSomething()
    {
       val = 10;
       val += 11;
    
       console.log(val);
    
       var val;
    }
    
    Output
    21

    Here, we are assigning (val=10), altering (val += 11) and logging (console.log) the value of the variable val even before the declaration of the variable. Also, we are calling the method before its declaration and still the code is working. This mechanism is called Hoisting.
    Now, consider this hoisting mechanism:
    function doSomethingNew()
    {
       console.log(val);
       var val = 10;
    }
    
    doSomethingNew();
    Output
    undefined
    Calling the doSomethingNew() method gives undefined. But why?
    This is because the interpreter follows a defined flow which involves:
    Javascript interpreter flow

    In doSomethingNew() method, the variable val is declared first.
    In javascript, all variables are initialized with the default value undefined.
    Then we log the variable on Line 3 which will give undefined. Finally, the value 10 would get assigned to the variable val.
    So the actual code created by the interpreter would look like:
    function doSomethingNew()
    {
       var val;
       console.log(val);
    
       val = 10;
    }
    
    doSomethingNew();
    
    Now, using the val after assigning it value will give its value as 10 like the code below.
    function doSomethingAgain()
    {
       console.log(val);
       var val = 10;
       console.log(val);
    }
    
    doSomethingAgain();
    
    Output
    undefined
    10

    Scope for Hoisting

    The scope for hoisting is limited to the code block in which the code is executing. This means we are able to access the variables only in the code block where the variable is accessible.
    var a;
    
    function demo()
    {
       a = 10;
       var b = 20;
    
       console.log("Inside demo function");
       console.log(a);
       console.log(b);
    }
    
    demo();
    
    console.log("Outside demo function");
    console.log(a);
    console.log(b);
    
    Output
    Inside demo function
    10
    20
    Outside demo function
    10
    Uncaught ReferenceError: b is not defined
    As you can see, we get a reference error when we try to access the variable b outside demo function. This is because the scope of variable b is limited to demo method and we cannot use it outside.

    Strict Mode

    ES5 has a strict mode that prevents hoisting. All we need to do is to write 'use strict'; statement before the javascript code and the browser will give an error stating that the variable is not defined in case of hoisting.
    Dependency injection is a design pattern that allows us to create loosely coupled classes.
    To understand loosely coupled classes, let us understand there opposite i.e. tightly coupled classes.

    Tightly Coupled Classes Example

    tight coupling between classes

    Consider this two classes:
    public class Class1: IClass1
    {
     public IClass2 class2;
    
     public Class1()
     {
      class2 = new Class2();
     }
    }
    
    public class Class2: IClass2
    {
    }

    instance of class 2 injected in class 1


    As you can see, Class 1 instantiates the object of Class 2 in its constructor.

    What if the logic for object instantiation for class 2 changes, class 1 also needs to be changed. This is called tight coupling between classes. To prevent such scenario, we use a design pattern called dependency injection.

    What is dependency injection?

    According to dependency injection, instead of instantiating the dependency object in a class, we just pass the dependency along with the object in its constructor.

    Dependency Injection may also be called as Inversion Of Control (IoC) as it follows the Hollywood Principle
    "Don't call us, We will call you."

    Dependency Injection In Action

    This can be well explained with the help of this example:

    Consider the architecture of a MathsCalculator class such that it is the concrete implementation of interface IMathsCalculator. The MathsCalculator class uses a MathsService instance to compute mathematical calculations like SquareRoot, CubeRoot etc.

    Here we will be using the dependency injection design pattern to decouple the two classes MathsCalculator and MathsService.

    class MathsCalculator: IMathsCalculator
    {
     IMathsService mathsService;
    
     MathsCalculator(IMathsService mathsServiceInstance)
     {
      mathsService = mathsServiceInstance;
     }
    
     float SquareRoot(float num)
     {
      float num = this.mathsService.sqrt(num);
      return num;
     }
    }
    
    void main()
    {
     IMathsService mathsService = new MathsService();
     IMathsCalculator mathsCalculator = new MathsCalculator(mathsService);
    
     float result = mathsCalculator.SquareRoot(5);
    
     Console.WriteLine(" Square Root: "+result);
    }
    
    Observe the way we injected the mathsService instance in the MathsCalculator object's constructor.

    This method to inject a dependent object in other class object is called as dependency injection.

    The main objective of the concept is that the class using service instances need not know about the service instantiation. It all should know about using the instance.
    Inversion of control is called so because it inverts the procedural programming flow.
    Instead of the class looking for its dependency to instantiate, we provide the class object with the instantiated dependency.

    Advantage of using Dependency Injection

    The advantage of using Dependency Injection is it simplifies unit testing of the project. Consider if the service injected makes use of internet services, messaging services, etc such that they only need to be mocked in unit testing. While executing the unit testing, we can provide a mock internet service or a mock messaging service, so that we do not end up with actual messaging to real people while unit testing the code.

    Now consider the scenario when there are nested dependencies injected like
    Class1 has dependency Dependency1
    Dependency1 has dependency Dependency2

    The code for instantiating the instance of Class 1 would be like:
    var instance = new Class1(new Dependency1(new Dependency2()));
    This looks a bit confusing. To prevent this, we use DI Containers. I have created a separate article on DI Containers which can be found here.
    Implementing the DI Containers >

    DI (Dependency Injection) Container/IoC (Inversion of Control) Container

    DI Container or IoC container are the terms that are used interchangeably but have the same meaning.

    What is it?

    Consider using the following code to instantiate a class with multiple services:
    var instance = new Class1(new Service1(), new Service2(new Service3()), new Service4());


    nesting of dependencies in dependency injection


    Will you prefer using the code as the one above?
    The answer would be NO as this is really fussy and confusing code to find out what is actually going on here.

    To solve the above problem, we use the DI Container, that helps us simplify the above code to human readable and understandable extent.

    Definition

    A DI Container is a framework that automatically creates the objects and injects the dependencies when required.
    To simplify the fuss related to creating instances( sometimes nested ) and injecting them, we use the DI container.

    With a DI Container used, the code will look something like:
    var instance = container.Resolve<Class1>();

    But how to implement this?

    This can be well explained with this detailed example below.
    There are a lot of DI Container frameworks in the market like Unity, Castle Windsor, StructureMap, Ninject etc. I will be using the Unity DI Container for this example.

    Installing Unity DI Container

    We will install Unity DI Framework with the Unity's NuGet package. To install the NuGet package, follow these steps:
    Step 1: Right-click the project name in the solution explorer and Click on "Manage NuGet Packages"

    Step 2: With the browse option selected, search for "Unity" and click on the download icon against it. Click Ok if you are prompted for installation.


    Implementing the Unity DI Container
    Consider a class Class1 such that it needs a dependency Dependency1. The class Dependency1 needs another dependency class Dependency2.
    class Class1 
    {
        IDependency1 dependency1;
        public Class1(IDependency1 dependency)
        {
            dependency1 = dependency;
        }
    }
    
    class Dependency1 
    {
        IDependency2 dependency12
    
        public Dependency1(IDependency2 dependency)
        {
            dependency2 = dependency;
        }
    }
    
    So the class object instantiation would look like:
    Class1 instance = new Class1(new Dependency1(new Dependency2()));
    Thus creating a nested dependency in the instantiation of the Class1 object.
    But this object instantiation looks a bit confusing and we need to sort this out.

    Implementing the DI Container

    Let's start using Unity DI Container.
    In our C# console application, first we need to import the Unity Namespace by adding a following reference to the import statements:
    using Unity;

    Now we need to register the types that will be injected whenever we need a service/dependency like whenever we need a IDependency1 service, the DI container will automatically inject the Dependency1 class instance.

    The syntax for registering the mapping between the type of object to be received and the actually needed object is:
    var container = new UnityContainer();
    
    container.RegisterType<IClass1, Class1>();
    container.RegisterType<IDependency1, Dependency1>();
    container.RegisterType<IDependency2, Dependency2>();

    All statements look similar. So what do these statements mean?
    Let's look at it.

    The format is something like:
    container.RegisterType<RequiredType, SuppliedType>();
    i.e. whenever an object of a IClass1 is required, the instance of Class1 object will be automatically passed by the DI Container.

    Now instead of instantiating Class1 object as:
    var instance = new Class1( new Dependency1( new Dependency2() ) );

    With the use of DI Container, I will simply instantiate Class1 object as:
    var instance = container.Resolve<IClass1>();

    The Container instance provides a resolve method that will automatically resolve the dependency and will supply the instance of Class1. Since Class1 further have IDependency1 needed, the DI Container will automatically pass a new instance of Dependency1 and so on.

    The final Code for the C# Console application will look like this:
    using System;
    using System.Collections.Generic;
    using System.Linq;
    using System.Text;
    using System.Threading.Tasks;
    using Unity;
    
    namespace ConsoleApp1
    {
        class Class1 : IClass1
        {
            IDependency1 dependency1;
    
            public Class1(IDependency1 dependency)
            {
                dependency1 = dependency;
            }
        }
    
        class Dependency1 : IDependency1
        {
            IDependency2 dependency2;
    
            public Dependency1(IDependency2 dependency)
            {
                dependency2 = dependency;
            }
        }
    
        class Dependency2 : IDependency2
        {
        }
    
        class Program
        {
            static void Main(string[] args)
            {
                var container = new UnityContainer();
    
                container.RegisterType<IClass1, Class1>();
                container.RegisterType<IDependency1, Dependency1>();
                container.RegisterType<IDependency2, Dependency2>();
    
                var instance = container.Resolve<IClass1>();
    
                Console.ReadKey();
            }
        }
    }
    If you have been developing applications with C#, then you must have encountered a concept named delegates. Delegates in C# can be referred as a pointer to methods.
    Instead of calling a method directly with its name, we call the method with its reference. They can be used for events and callbacks.

    A Direct method call would look like:

    FindSquare(5) // to get the square of a number
    or, Factorial(5); //to find factorial of a number
    

    how a c# function call works


    A delegate call (pseudocode) would look something like:


    delegate numberChanger = FindSquare->Reference


    where numberChanger is the name is the delegate that holds the reference to the function.


    Implementing a simple numberChanger delegate

    Consider the following method:
    int FindSquare( int number )
    {
        return (number*number);
    }
    

    To create a delegate, we need to create a new delegate object using the new operator.

    The syntax for delegate declaration is:

    delegate <return-type> <delegate-name> (<parameters>)

    The actual implementation will look like:

    Step 1: Declaring the delegate
    delegate int ModifyNumber(int number);

    Step 2: Instantiating the delegate 
    var numberModifier = new ModifyNumber(FindSquare);

    Note that the parameter is the name of the method that we want to reference with the delegate.

    Step 3: Using the delegate
    int number = numberModifier(5);

    class Program {
     delegate int ModifyNumber(int number);
    
     static int FindSquare(int number)
     {
      return (number * number);
     }
    
     static void Main(string[] args)
     {
      var numberModifier = new ModifyNumber(FindSquare);
      int temp = numberModifier(5);
      Console.WriteLine(temp);
     }
    }

    C# Program
    delegate simple example to modify a number

    Output
     25                                      

    Delegate Chaining

    The benefit of using delegate is that it allows chaining of method calls in a single delegate reference.

    like, delegate "print" can point to two different methods
    1. printing the output to console
    2. ‎saving the output in a log file

    But how? Let's see this in action.


    Consider the following two methods:

    static void WriteToConsole(string name)
    {
        Console.WriteLine("Name is : " + name);
    }
    
    static void WriteToFile(string name)
    {
        //Code to write name to file
        Console.WriteLine("Written name to file : " + name);
    }

    Here, we will be creating a delegate such that calling the delegate will invoke these two methods one by one.

    Step 1: Declaring the delegate (Same as we did before)

    delegate void NameWriter(string str);

    Step 2: Creating new delegate objects pointing to these methods.

    var writeToConsole = new NameWriter(WriteToConsole);
    var writeToFile = new NameWriter(WriteToFile);
    

    Step 3: Create empty delegate variable.
    We will use this delegate to call the chained methods.

    NameWriter nameWriter;

    Step 4: Setting nameWriter reference to the first method.

    nameWriter = writeToConsole;
    Notice, how we assigned the variable writeToConsole to the nameWriter variable.

    Step 5: Chaining/Appending references of other methods to the delegate.

    New references are chained to a delegate in the following manner:

    nameWriter += writeToFile;
    Here we appended the writeToFile reference to the nameWriter.

    Step 6: Using the nameWriter delegate.

    nameWriter("Kunal");

    The following output will be produced when executing the above code:

    C# Program
    class Program
    {
     static void WriteToConsole(string name)
     {
      Console.WriteLine("Name is : " + name);
     }
    
     static void WriteToFile(string name)
     {
     //Code to write name to file
      Console.WriteLine("Written name to file : " + name);
     }
     
     /************* Step 1 *************/
     delegate void NameWriter(string str);
     /**********************************/
     
     static void Main(string[] args)
     {
      /************* Step 2 *************/
      var writeToConsole = new NameWriter(WriteToConsole);
      var writeToFile = new NameWriter(WriteToFile);
      /**********************************/
     
      /************* Step 3 *************/
      NameWriter nameWriter;
      /**********************************/
     
      /************* Step 4 *************/
      //appending functionalities to write name
      nameWriter = writeToConsole;
      /**********************************/
     
      /************* Step 5 *************/
      nameWriter += writeToFile;
      /**********************************/
     
      /************* Step 6 *************/
      //write names to console and to file in this single statement
      nameWriter("Kunal");
      /**********************************/
      
      //wait for keypress to exit
      Console.ReadKey();
     }
    }
    

    Output:


    And done. You just appended multiple references to a single delegate and calling this delegate will call all of the chained methods one by one.
    Older
    ARTICLES

    IEnumerable vs ICollection vs IList vs IQueryable in C#

    Popular Posts

    • Object Creation Patterns in Javascript
    • IEnumerable vs ICollection vs IList vs IQueryable in C#

    Created with by BeautyTemplates

    Back to top